Unlocking Creativity with the Plaid Texture Brush Set for Procreate
In the vibrant world of digital illustration, texture is often the bridge between a flat image and a masterpiece. Among the myriad of patterns available to digital artists, the plaid design holds a timeless appeal. Whether you are designing fashion textiles, creating cozy backgrounds for journals, or adding depth to character clothing, plaid offers a sense of structure and warmth. However, manually drawing perfect intersecting lines can be tedious and time-consuming. This is where the Plaid Texture Brush Set for Procreate becomes an indispensable tool for both novice and seasoned iPad artists.
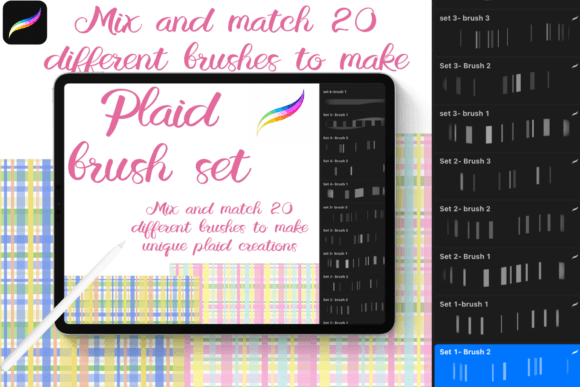
This comprehensive guide explores how this specific brush set revolutionizes the pattern-making process, offering 20 distinct brushes designed to help you mix and match unique plaid patterns effortlessly. We will walk through the features, practical application, installation steps, and the broader significance of such tools in modern digital creativity.
The Art and Utility of Digital Plaid Textures
Plaid, also known as tartan, is more than just a geometric arrangement of colored stripes. It is a complex interplay of vertical and horizontal bands that create a woven illusion. In traditional textile design, achieving this look requires precise weaving techniques. In the digital realm, it demands patience and steady hands to align layers perfectly.
The Plaid Texture Brushes feature solves this challenge by providing pre-engineered stroke mechanics. Instead of drawing every single thread of a fabric, these brushes simulate the texture and overlap of plaid automatically. With 20 different brushes included in the set, users have the flexibility to vary line thickness, opacity, and texture roughness. This variety allows artists to move beyond generic, computer-generated grids and create organic, hand-drawn plaid patterns that feel authentic and rich.
Why Mix and Match Matters
The true power of this brush set lies in its versatility. A static pattern can look repetitive, but by mixing and matching different brushes from the set, you can create infinite variations. One brush might provide a thick, bold base layer, while another adds a subtle, textured overlay. This approach mimics the way natural fabrics wear and fade over time, adding a layer of realism that standard vector shapes cannot achieve.
For designers working in fashion, education, or interior design concepts, having a library of custom textures saves hours of workflow. It fits seamlessly into modern creative industries where speed and quality must coexist. Whether you are preparing assets for a client presentation or simply experimenting with color theory, these brushes empower you to focus on composition rather than technical execution.
Step-by-Step: Creating Your First Custom Plaid Pattern
To truly understand the capabilities of the Plaid Texture Brush Set for Procreate, let us walk through a practical example. This tutorial demonstrates how to layer colors and rotate your canvas to build a classic, multi-colored plaid design from scratch.
Prerequisites: Ensure you have the latest version of Procreate installed on your iPad. This brush set is optimized specifically for the iPad ecosystem and will not function on desktop versions of Procreate or other tablet applications.
The Creative Process
- Select Your Foundation: Open a new canvas in Procreate and import the Plaid Texture Brush Set. Navigate to your brush library and choose the first brush from the collection (Brush 1).
- Apply the First Color Layer: Select a deep shade of blue from your color palette. Using Brush 1, draw vertical lines across your canvas. These will serve as the primary vertical threads of your plaid pattern.
- Add Secondary Vertical Lines: Switch to Brush 2. Change your color to a bright yellow. Draw additional vertical lines, perhaps slightly offset or thinner than the blue ones, to add complexity to the weave.
- Introduce a Third Hue: Now, select Brush 3 and change your color to a forest green. Add another set of vertical lines. At this stage, your canvas should look like a series of vertical stripes in blue, yellow, and green.
- Rotate for Horizontal Weaving: Here is the secret to creating the plaid effect. Use the Transform tool or simply rotate your iPad device so that your existing vertical lines are now horizontal relative to your screen. Alternatively, use the "Rotate Canvas" gesture within Procreate. This step ensures that your next strokes will cross over the previous ones at a perfect 90-degree angle.
- Layer the Horizontal Stripes:
- Keep the canvas rotated. Select Brush 1 again, but this time switch your color to green. Draw lines across the canvas to intersect with the vertical stripes.
- Switch to Brush 2, change the color to blue, and draw more horizontal lines.
- Finally, use Brush 3 with the color yellow to complete the horizontal grid.
- Finalize Your Creation: Rotate the canvas back to its original orientation. You will now see a beautiful, custom-made plaid pattern where the colors intersect to create new shades and textures. Enjoy your unique plaid creation!
This method highlights how the brush set encourages experimentation. By swapping colors and brushes at each stage, you can generate hundreds of distinct patterns without ever needing to learn complex node-based design software.
Installation Guide: Getting Started on Your iPad
One common misunderstanding among new digital artists is assuming that purchasing a digital product means it instantly appears in their app. To ensure a smooth experience with the Plaid Texture Brush Set for Procreate, follow this detailed installation protocol. Please note that these files are specifically formatted for the iPad operating system.
How to Open in Procreate
- Receive Your Files: Once you finish purchasing the listing, check your email inbox. You will receive a confirmation email containing a secure link to download the product files.
- Download the Package: Click the "Download Files" button in the email, then click "Download" to save the compressed file to your device's Files app.
- Unzip and Transfer:
- If downloading directly to your iPad, open the Files app, locate the downloaded zip file, and tap it to unzip.
- If you purchased on a desktop computer, you can transfer the files to your iPad via Dropbox, AirDrop, or iCloud Drive. Simply upload the files to one of these services and open them on your iPad.
- Import to Procreate: Locate the unzipped .brushset file. Tap on it and select "Open in Procreate" or "Copy to Procreate" from the share sheet menu. If prompted, confirm the action.
- Verify Installation: Launch the Procreate app. Go to the Brush Library (the brush icon), and scroll down to the bottom of your list. You should see a new folder named after the Plaid Texture Brush Set. Tap to expand it and start using the brushes immediately.
Common Misconceptions and Technical Requirements
While digital art tools have become more accessible, there are still barriers to entry that can frustrate beginners. The most significant assumption is compatibility. Many users expect brush sets to be universal across all devices. However, the Plaid Texture Brush Set for Procreate is strictly designed for the iPad environment. It relies on specific rendering engines found only in the mobile version of Procreate.
Important Note: This brush set will not work on Windows PCs, Macs, or Android tablets. Furthermore, you must have the latest version of Procreate installed. Older versions of the app may lack the necessary engine updates to interpret the complex texture data embedded in these brushes. Before attempting installation, always check the App Store for updates to ensure your software is current.
Another common issue involves file formats. Users sometimes try to open the .brushset file directly in a text editor or photo viewer, which results in errors. Remember, these files are meant to be imported exclusively through the "Open in Procreate" function described above. Following the correct workflow ensures that the 20 unique brushes retain their intended behavior and texture fidelity.
The Broader Impact on Digital Creativity
Beyond the immediate utility of drawing plaid patterns, tools like the Plaid Texture Brush Set for Procreate represent a shift in how we approach digital craftsmanship. They democratize high-quality texture creation, allowing hobbyists to produce professional-grade assets. In education, teachers can use these brushes to demonstrate color theory and pattern repetition to students without getting bogged down in technical drawing skills.
In business and freelance design, efficiency is currency. Having a dedicated set of brushes for specific textures like plaid reduces project turnaround times significantly. It allows designers to iterate faster, presenting clients with multiple variations of a design in minutes rather than hours. This agility is crucial in today's fast-paced creative economy.
Furthermore, the ability to mix and match colors and brushes fosters a deeper understanding of visual rhythm. As artists experiment with the intersection of blue, yellow, and green lines, they intuitively learn how overlapping transparent layers create new hues—a fundamental concept in both digital and physical painting.
Conclusion
The Plaid Texture Brush Set for Procreate is more than just a collection of digital stamps; it is a gateway to exploring the intricate beauty of woven patterns. With 20 versatile brushes, clear installation instructions, and endless possibilities for color combination, it empowers artists to bring their visions to life with precision and style. Whether you are following the step-by-step guide to create a simple blue, yellow, and green plaid or developing complex textures for a major project, this tool provides the foundation for success.
Remember to keep your Procreate app updated and ensure you are working on an iPad to unlock the full potential of this set. By mastering these tools, you join a community of creators who value both artistic expression and technical efficiency. So, download your files, unzip them, and let your creativity flow across the digital canvas.